

I got the RG148-1200-3633 that runs on 230v instead of 24 Volt. Maybe the Power rating is different for that model. That blower has a regulation input to adjust the RPM. Btw: There ist no "too big": If you draw less wind from the blower, the power goes down automatically. The 120W of your blower will be the maximum when you let it blow out freely without air flow restriktion. Regards, Jens
Beiträge von JGB
-
-
Regarding the rg148: Just Google for "ebmpapst rg148 data Sheet", then you find the PDF. It can deliver 1,9 cubic meters at 3200 Pa (320mm) so you have to regulate it down in pressure. The blower can do that but you need to build the electronic interface for that. If you're interested: There was a whole thread in this topic which you can find in the forum here. Nice thing about the blower ist that it is very compact in size. Regards, Jens
-
Hi Xiaohu, that will work I guess. If it is not silent enough, you can still build a silencing box around it. Just try it out. Regards, Jens
-
Here's a link to a provider: https://organparts.info/de/62-…harmonien-und-kleinorgeln. The smallest blower available delivers 60mm and 1,8 cubic Meters of air per minute
-
Hi Xiaohu, pressure in Pascal is about ten times the pressure in millimeter of water column. If you want 45mm or 450 Pascal in your instrument you have to add a little bit in order to have some margin for pressure regulation with the bellows/ventil combination. So I would suggest having a blower that can deliver 60mm or 600 Pa. There are also special organ blowers in the market like the ones from organparts.info but they are rather expensive. If you can afford it, take such a special blower: they just work as intended. Else, you have to experiment a little bit. I use a 2nd hand ebm RG148 blower (now ebmpapst) that can be regulated. But it can only handle about 1 or 2 organ stops. Regards, Jens
-
Hi Xiaohu, the height of the pallet box (which also works as bellows on my Instrument because the bottom can move) is 50mm on the inside. I don't think that the height is very critical. You may have to think about enough space to be able to get to the springs if there is some error to be fixed. This has the advantage that you don't need to disassemble everything when something blocks or hangs. Regards, Jens
-
Hallo liebe Hausorgelfreunde,
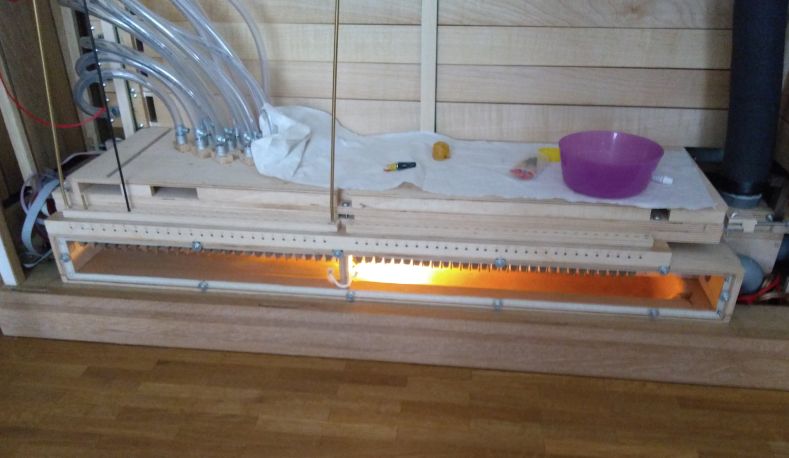
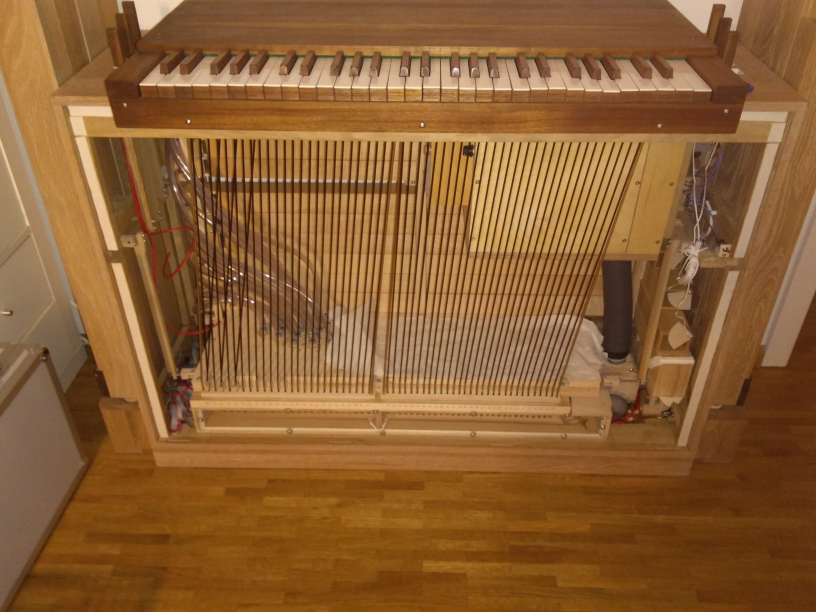
der Bau geht weiter. Hier erst mal ein Bild mit beleuchteter Windlade:
Dann hier noch eine kleine Bilderserie, wie ich den Reguliermechanismus an den Stechern gebaut habe:
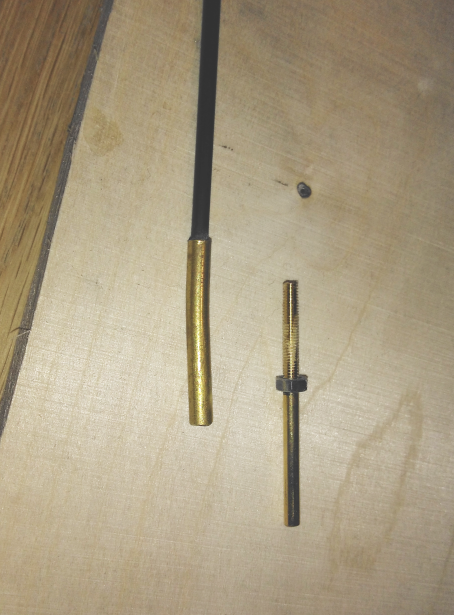
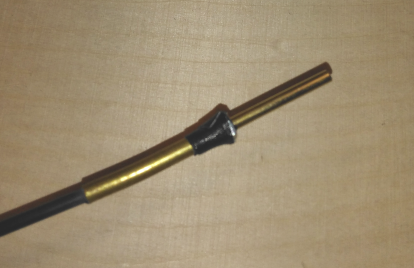
Die Einzelteile: Karbonfasterstange mit Röhrchen aufgeleimt, Stück Messingstange mit Gewinde aufgeschnitten, Standard-M3-Mutter:
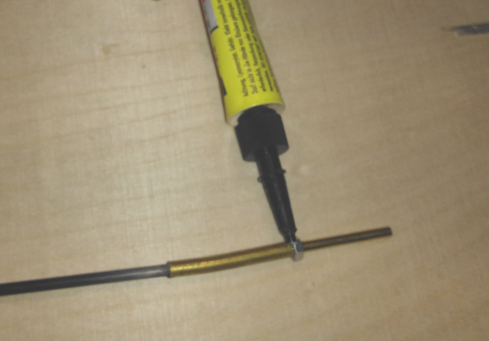
Das Gewinde ist etwas eingewachst damit der Sekundenkleber beim nächsten Schritt nicht am Gewinde ankleben kann. Dann Sekundenkleber (in Gelform) an der Mutter angeben:

Dann etwas Gewebeklebeband um die frisch geklebte Stelle wickeln damit die Finger sauber bleiben und die Klebestelle trocknen kann ohne dass sich etwas bewegt:
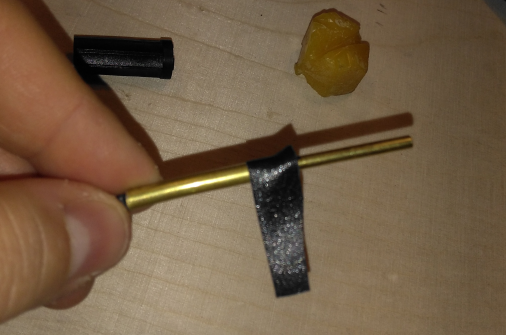
Dann Ausdrehen der Messingstange aus der Mutter, neu Bienenwachs ans Gewinde und wieder eindrehen, fertig!
Zur Längenregulierung muss man dann nur noch an der Messingstange mit Gewinde drehen. Das geht gut von Hand ohne Werkzeug. Das gewachste Gewinde sorgt dafür, dass ein gewisser Halt da ist und sich nichts von alleine verstellt.
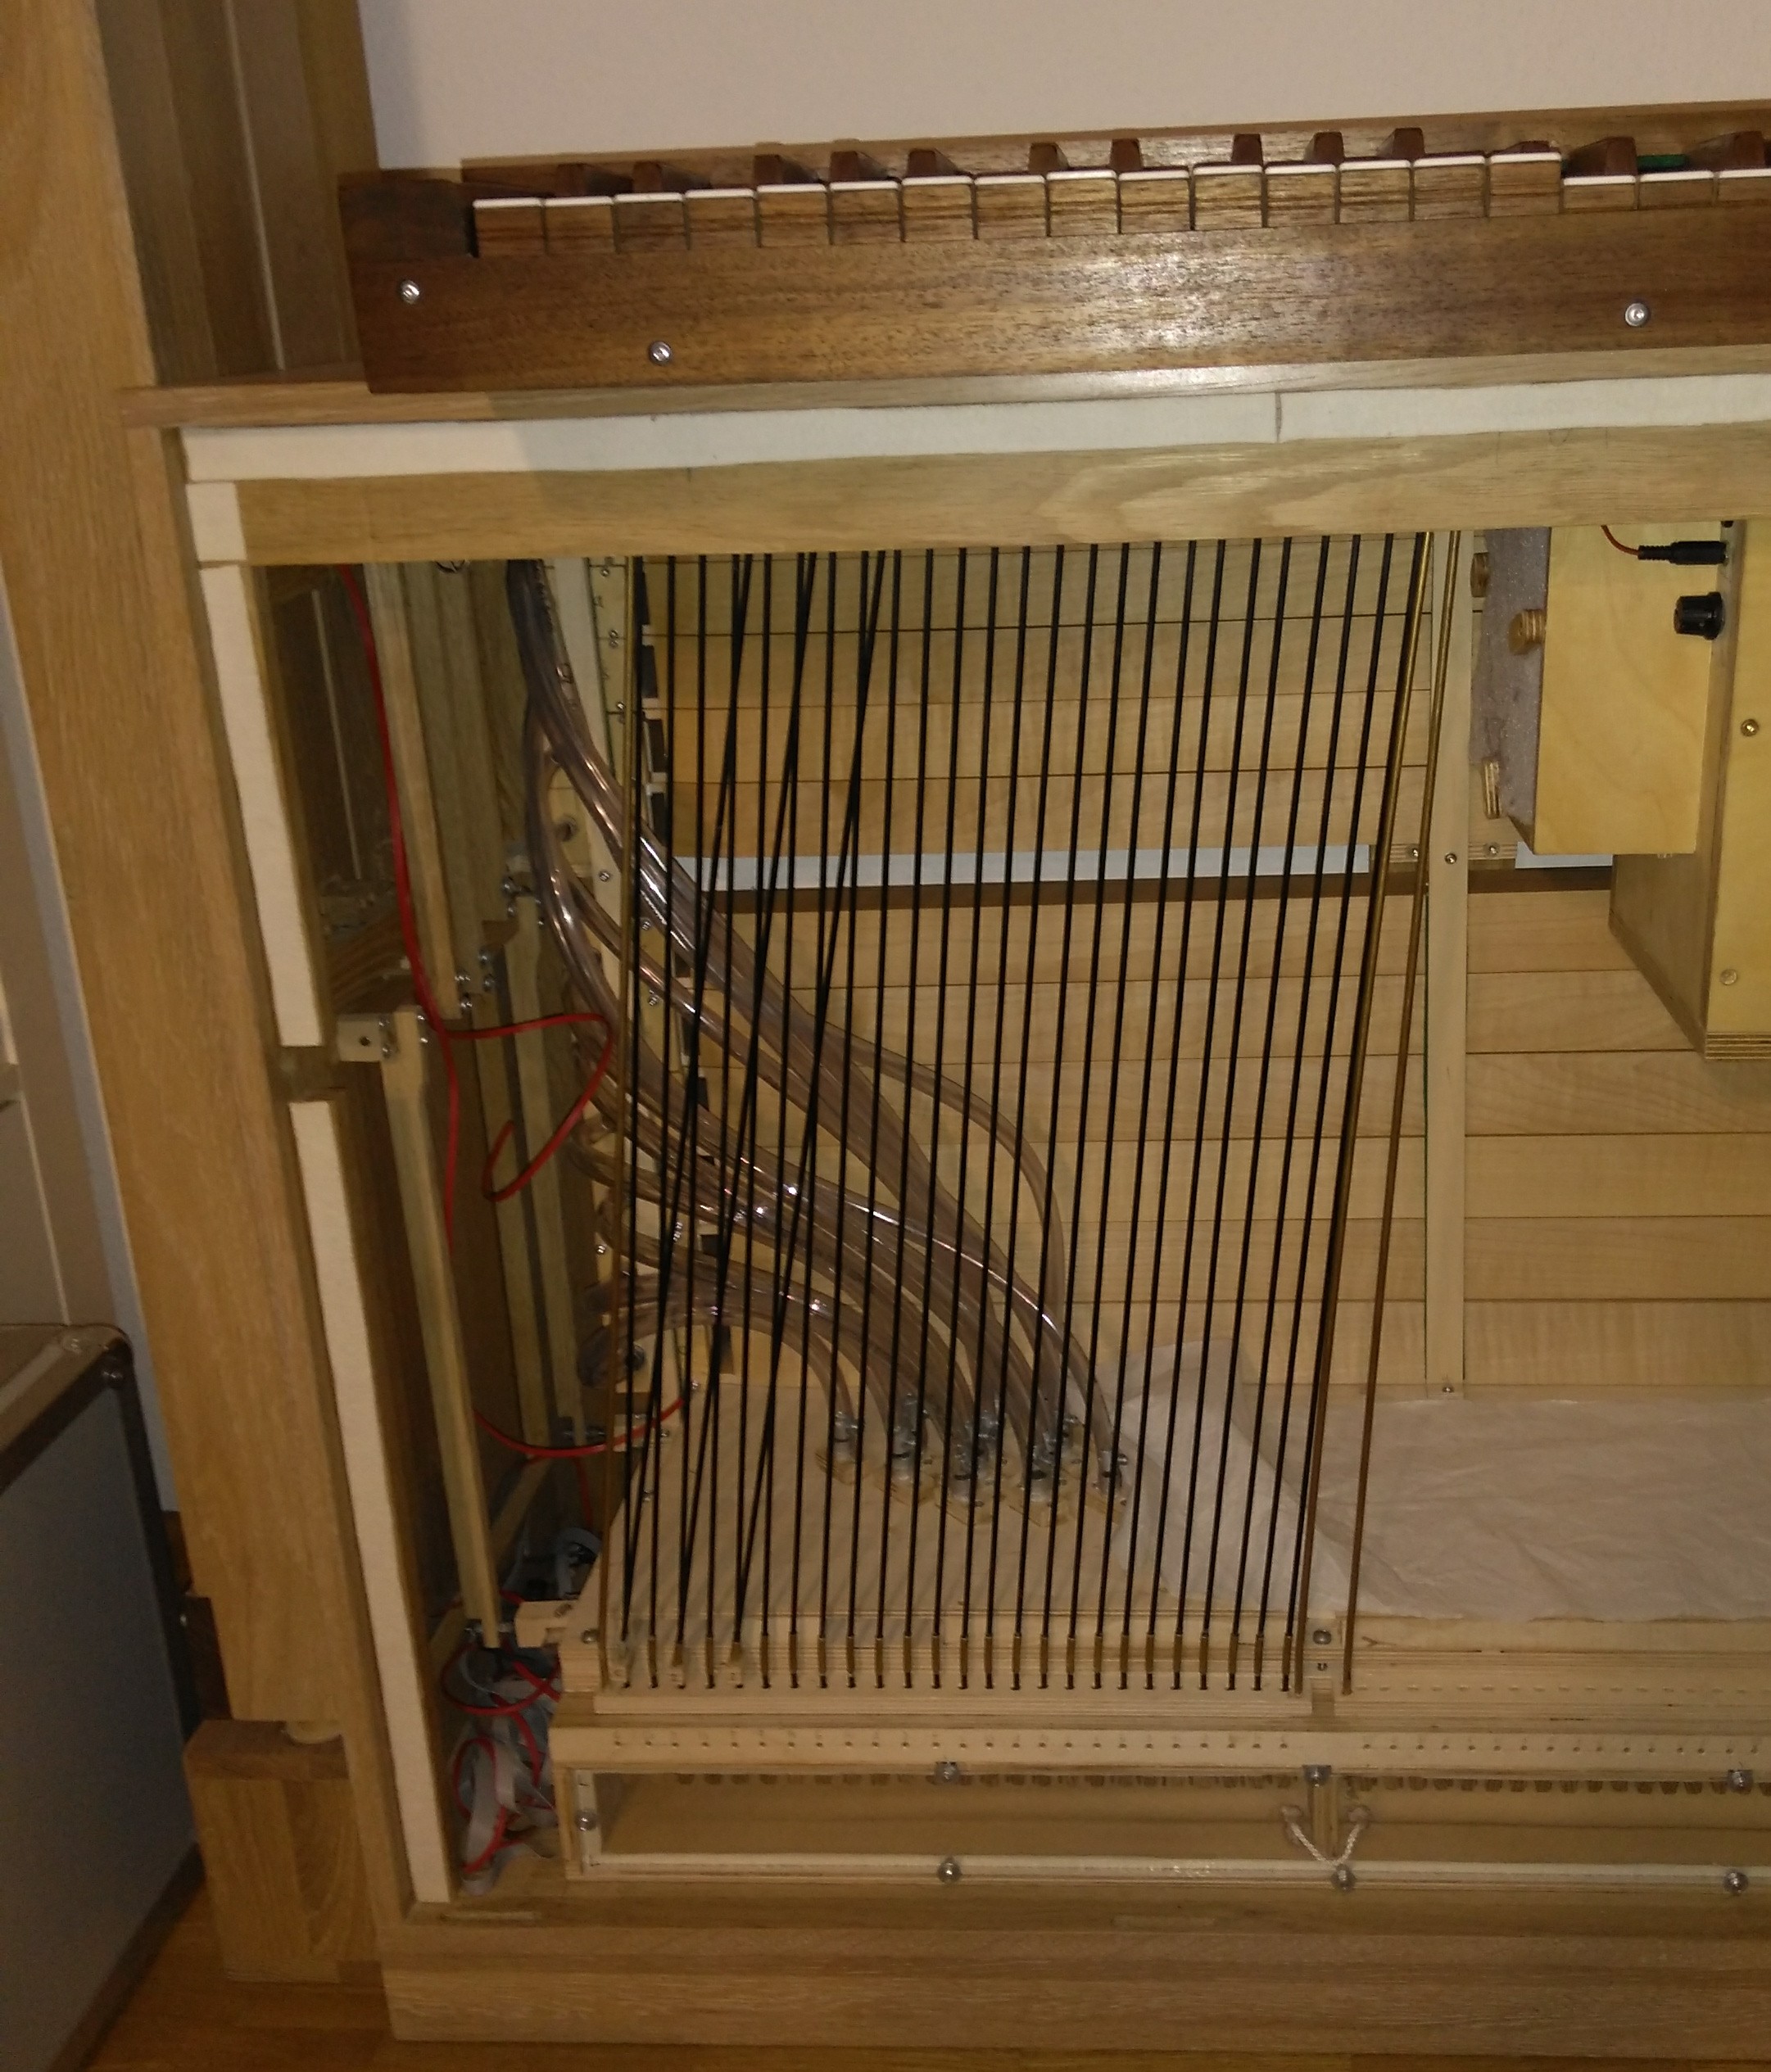
Hier nun alle Stecher eingebaut:
Dann habe ich gemerkt, dass die Ganztontasten schon einiges schwerer sind als die Halbtontasten. Vor allem die Taste f3 war problematisch da sie ja über die ganze Länge breit ist und damit schwerer als die anderen. Daher habe ich die Tasten von unten mit einem Forsterbohrer ausgehöhlt um das Gewicht anzupassen. Hat gut funktioniert. Jetzt läuft jede Taste leicht, aber nicht zu leicht.
Als nächstes baue ich die Elektronik um die 12 tiefsten Stecher mittels Reflexlichtschranke abzunehmen um die 8 Pfeifen/Doppeltonpfeifen anzusteuern. Die Bauteile sind inzwischen eingetroffen und ich habe mit einer Schaltung experimentiert die hoffentlich gut funktioniert. Demnächst werde ich das auch vorstellen, dann kann ich hoffentlich schon 2 Oktaven auf der Orgel spielen.
Dann würde für ein einigermaßen komplettes Instrument nur noch der Bau und die Intonation der Pfeifen c1-f4 fehlen. Das Holz dafür ist bereits zugesägt. Ich sehe endlich Licht am Ende des Tunnels
 Pedalklaviatur und Tremulant werde ich irgendwann später nachrüsten.
Schönes Wochenende Euch allen!
-
Hello Xiaohu, your keyboard is ending on note E. That's a bit strange because the "usual" compass is rather up to a2 (renaissance), c3 or d3 (baroque) or f3/g3 (later). If you prefer to play music after the baroque era, I would suggest to go up to at least f3 which is one note more as far as I can tell. Regards, Jens
-
That will work. Consider that you may need to lift the keyboard at the front while shifting to not "scratch" the keyboard at the bottom with the rods/stickers. Another simple solution is just to have a block of wood with the thickness of one key which can be added at the left or right of the keyboard. Then, you don't even need a dowel pin. I saw this on harpsichords:
-
Hello Xiaohu,
congratulation to your decision to build an instrument. Theo Koele was also an inspiration to me; he makes nice sounding instruments and the many images and videos on youtube and on his website helped me also a lot.
Your drawings look fine, I think that they will work. I didn't check the exact measurements, but when you follow some norm, such as the BDO norm or the AGO norm of keyboards (or measurements near those norms), it will work. Taking measures from existing instruments is of course also an option.
Finishing it in one year is indeed challenging. I would rather say that about 5 years is more realistic. Let's say, a professional organ builder finishes an instrument like that in a quarter of a year, working 7 hours a day on it. This would be about 90 days time 7 hours = 630 hours. When you have about one hour per day to build, this would equal 630 days, which is almost two years. If you have only about half an hour, this doubles to about 4 years. That's only a rough estimation. It also depends on the family situation and if you can work on it at the weekends or vacation or if you are going to use existing parts. But sorry, I didn't want to discourage you. Just try and start and have fun, but don't be discouraged when it will take longer than expected
I didn't build my keyboard all by myself. I got a used one out of eBay and made new key toppings. I used plastic key covers like these: https://organparts.info/en/21-manual-keyboard?p=2 and made the accidental covers (C#, Eb, F#, G# Bb) by myself out of wood.
Regards,
Jens
-
Kleines Update: Alle Stecher der Basshälfte (C-c') sind eingebaut. Jetzt baue ich die Stecher für die Diskanthälfte und sobald die bestellten Elektronikbauteile da sind, werde ich die Leiterplatten für die Reflexlichtschranken bestücken, die die Töne C-H optisch abnehmen und die äußeren gedeckten Pfeifen ansteuern.
Hier ein Foto vom aktuellen Zustand:
Gruß, Jens
-
Hier noch ein Link den ich gefunden habe zum Thema Kurze Oktave und wofür sie sich eignet:
-
Hallo SamES, danke! Die Klaviatur muss ich zum Glück nicht ausbauen zum Umschalten; leicht vorne anheben reicht aus, dann komm ich an den Stecherrahmen dran. Mit dem Hebel müsste ich nachdenken wie man das machen könnte... Vielleicht eine Holzleiste am Mittelpunkt des Rahmens einhängen so dass man dran ziehen oder drücken kann. Um's Anheben komme ich aber leider nicht drum rum da in der Unterseite der Tasten Löcher sind, in denen die "ungenutzten" Stecher verschwinden.
Gruß, Jens
-
Hallo Fawe, ich habe auch schon probiert, direkt auf die Carbonstangen ein Gewinde zu schneiden. Geht leider nicht: Dadurch, dass die Fasern längs sind und das Gewinde quer dazu geschnitten wird, bröselt alles was man schneidet gerade wieder weg. Ich habe es anders gelöst: Am oberen Ende der Carbonstange ist ein Röhrchen aus Messing (innen 3mm, außen 4mm, dasselbe wie beim Knick unten) und auf dieses Röhrchen habe ich eine Standard-M3-Mutter geklebt mit Sekundenkleber. Etwas Gewebeklebeband um Mutter und Röhrchen damit man sich nicht die Finger einsaut beim Verkleben. Dann habe ich zum Regulieren auf 3mm-Messingstangen (Länge ca. 5 cm) ein Gewinde aufgeschnitten (etwa 2 cm lang) und mit Bienenwachs das Gewinde eingewachst. Das ganze dann eingeschraubt in die Mutter/Röhrchen. Das Wachs verhindert, dass sich das Gewinde frei bewegen und verstellen kann, trotzdem kann man per Hand drehen (mit etwas gewolltem Widerstand durch das Wachs) und so die Länge des Stechers beeinflussen. Eine Sicherungsmutter M3 geht bestimmt auch, aber ich hatte die Befürchtung, dass die Sicherung zu sehr bremst so dass es zu schwergängig wird. Oder man nimmt einen Stellring mit Madenschraube, aber das ist glaube ich ziemlich "fummelig". Oder Ledermuttern, oder, oder... Gibt bestimmt viele Möglichkeiten. Kleinen Tip noch: Vor dem Ablängen der Carbonstangen mit einem scharfen Messer einmal rundrum schneiden wo man sägen wird. Dann reißt weniger aus. Habe mit einer Standard-Eisensäge mit wenig Druck gesägt und das ging dann ganz gut.
Was die Kondukten angeht: Ich habe einfach ein bisschen ausprobiert. Bei mir sind es von c-h Schläuche außen 12 innen 10 und ab dann außen 10 innen 8 bis zum Ton e', der der letzte abkonduktierte Ton ist. Das reicht bei den engen Kernspalten, die ich an den Pfeifen habe, locker aus. Ist sogar noch etwas Reserve; ich musste trotz der Kondukten ordentlich drosseln damit die Pfeifen nicht oktavieren. Zu große und lange Schläuche könnten die Ansprache beeinflussen, aber probiere das einfach mal aus. Habe die Erfahrung jetzt schon an vielen Stellen gemacht dass man sich zu viele Gedanken macht ob etwas funktioniert und meistens geht es dann "einfach" und andere Dinge, an die man nie gedacht hat, funktionieren nicht so gut. Schau die mal die Orgel von nippocast (youtube) an, der hat auch viele Kondukten und trotzdem merkt man nichts davon bei der Ansprache.
Hello Xiaohu,
no, I think it is useful, but it depends on personal taste and what we individually consider more important. For me, an organ tuning with more clean harmonies was more important than a transposable keyboard. But I will play mainly for myself or with my family/friends on this instrument, and they will be tuned to 440 Hz. I personally like early baroque and renaissance repertoire. Later music needs more equal-like, milder temperaments. So, for me, there is just no need for transposing. But when I would need to build an organ for non-domestic, concert usage to play in ensembles with instruments tuned, let's say, to 415 Hz, transposing would be a "must". But you can also combine both: Add transposing mechanism and give good access to the pipes to be able to easily re-tune. Maybe, in that case, a bigger organ case is necessary to give better access to the pipes. My organ is build for compactness to easily fit into the apartment, which makes it a bit harder to access the pipes. A transposing mechanism is easily built: Just allow the position of the keyboard to be shifted to left and right and maybe provide one more pipe at the top and bottom to fill-in the missing notes.
Regards, Jens
-
Hi Xiaohu,
- So the brass tube holds two rods, a long one and a short one on each end, with a gap of 3-4mm for the bass tube to bend? I think I finally understood. - Yes, exactly
- But in order to stay air tight and lifting weight of the rod and the brass tube, what is the required force or the pound of the torsion spring on the pallet? - I didn't measure it, but I guess about 300g or 3 Newton. A lot more than the pallet itself would need to seal the hole in the wind chest
- "There is a 1:2 down ratio in the keys because the rods are connected at about the middle of the keys, so the movement of the rod is only about 3 to 4 mm" Therefore, the movement at the end of the key is 6-8mm? - Yes
- Is there a positioning hole at the middle of the key to hold the rod? Or how to position the whole keyboard making the a row of rods at their position? - They are only held in their wooden frame and the wood of the keys directly pushes on them. I want to add small thin felt discs to reduce noise, but it works also with keys directly pressing the rods. When building the frame for the rods, I measured the keyboard in advance so the rods will end up at the center of the key (or nearly center, some tolerance allowed)
- Is there also consideration for the transposition of frequencies? say from 414 to 440 Hz, shifting the whole keyboard right or left. - No, I don't need that for doing music at home. It is also somewhat problematic because the organ will be tuned in "modified meantone" to support playing renaissance and early baroque music (https://en.wikipedia.org/wiki/Meantone_temperament), and when tuning this way, shifting the keyboard may result in very wrong/odd sounding chords. When tuning equal temperament or somewhat nearly equal, keyboard shifting/transposing is a good idea. Also when doing music in ensenbles that have instruments tuned other than 440 Hz.
Regards, Jens
-
Hi Xiaohu,
you're welcome, I like it when I can help out and answer questions.
- Does the brass tube at bottom end of the rod serve to bend the fiberglass rods? No, the fiberglass rods are cut at the parts where the tube is. They are inserted and glued about 10mm, and at the place where the brass tubes are bent, there is no rod (a small gap of about 3mm). The fiberglass rods themself aren't really bendable. They bend but then instantly spring back or they break. They are so stiff that you'll need some other materials for the slight angles. That's what the tubes are for.
- Therefore, the brass tube is also slightly bent to guide the fiberglass? No, that didn't work out. Only the brass is bent
- This is really a novel design then the traditional wooden ones or metal rods, but does it have any cons? I don't know of any cons. Maybe I can tell after some years of usage. The idea comes from the book "Bouwplan voor Kistorgel" written by John Boersma (Dutch).
- Meanwhile, does the brass tube also use as a 'stopper' to prevent excessive action on the pallet? Yes, in some respect. But they aren't really used as stopper, they act as a kind of stop so the rods won't fall out when the frame that holds them is lifted out of the organ case. But when playing, no tube touches some other parts. That would be noisy. The keyboard itself limits the amout of travel. There is a 1:2 down ratio in the keys because the rods are connected at about the middle of the keys, so the movement of the rod is only about 3 to 4 mm
Also does the bottom end of the fiberglass rod need to air seal, to prevent air leakage through the hole for the rod when the pallet opens? No, the pallet leather itself seals enough. When a note is played, a tiny little amout of air escapes, but this is no problem
- If there is no rod, the keyboard is actually in the pressed down position? Yes
- Could you show a photo for the status of the keyboard when there is no rod lifting? Just look at the video. Currently, only the lower octave is connected, so the other keys are at down position. Also, in short octave mode, the first 4 keys are down.
BTW: My name is Jens, not Jans. Jens is a North German/Danish form of the well known name Johannes, a biblical name.
Regards, Jens
-
Hi Xiaohu,
what I forgot to mention: The rods sit above the pallets. The pallets have springs that keep them close and this spring is strong enough to also lift the rods and the keys, just like shown here (article from wikipedia):
https://de.wikipedia.org/wiki/…_spr%C4%99%C5%BCynowa.png
This article shows a completely different design of chest, but I think you get the idea. The pallet is leathered and self-seals the hole through which the rods go.
You can also check out the earlier images in this thread and the former thread "Bau Truhenorgel mit Prinzipal" to see pictures of the wind chest that I've built. There, you can see the pallet springs as well.
Regards,
Jens
-
Hi Xiaohu,
the rods are 3mm fiberglass rods that are usually made for kites. They are very stiff. Traditionally, wood would have been used, but I saw this method and liked it. At the bends, I used 4mm outside/3mm inside tubes made out of brass which I found in the local hardware store and glued in the rods using CA glue. The double rods (C, D and E) are connected with very small wood blocks. Here's a picture of that:
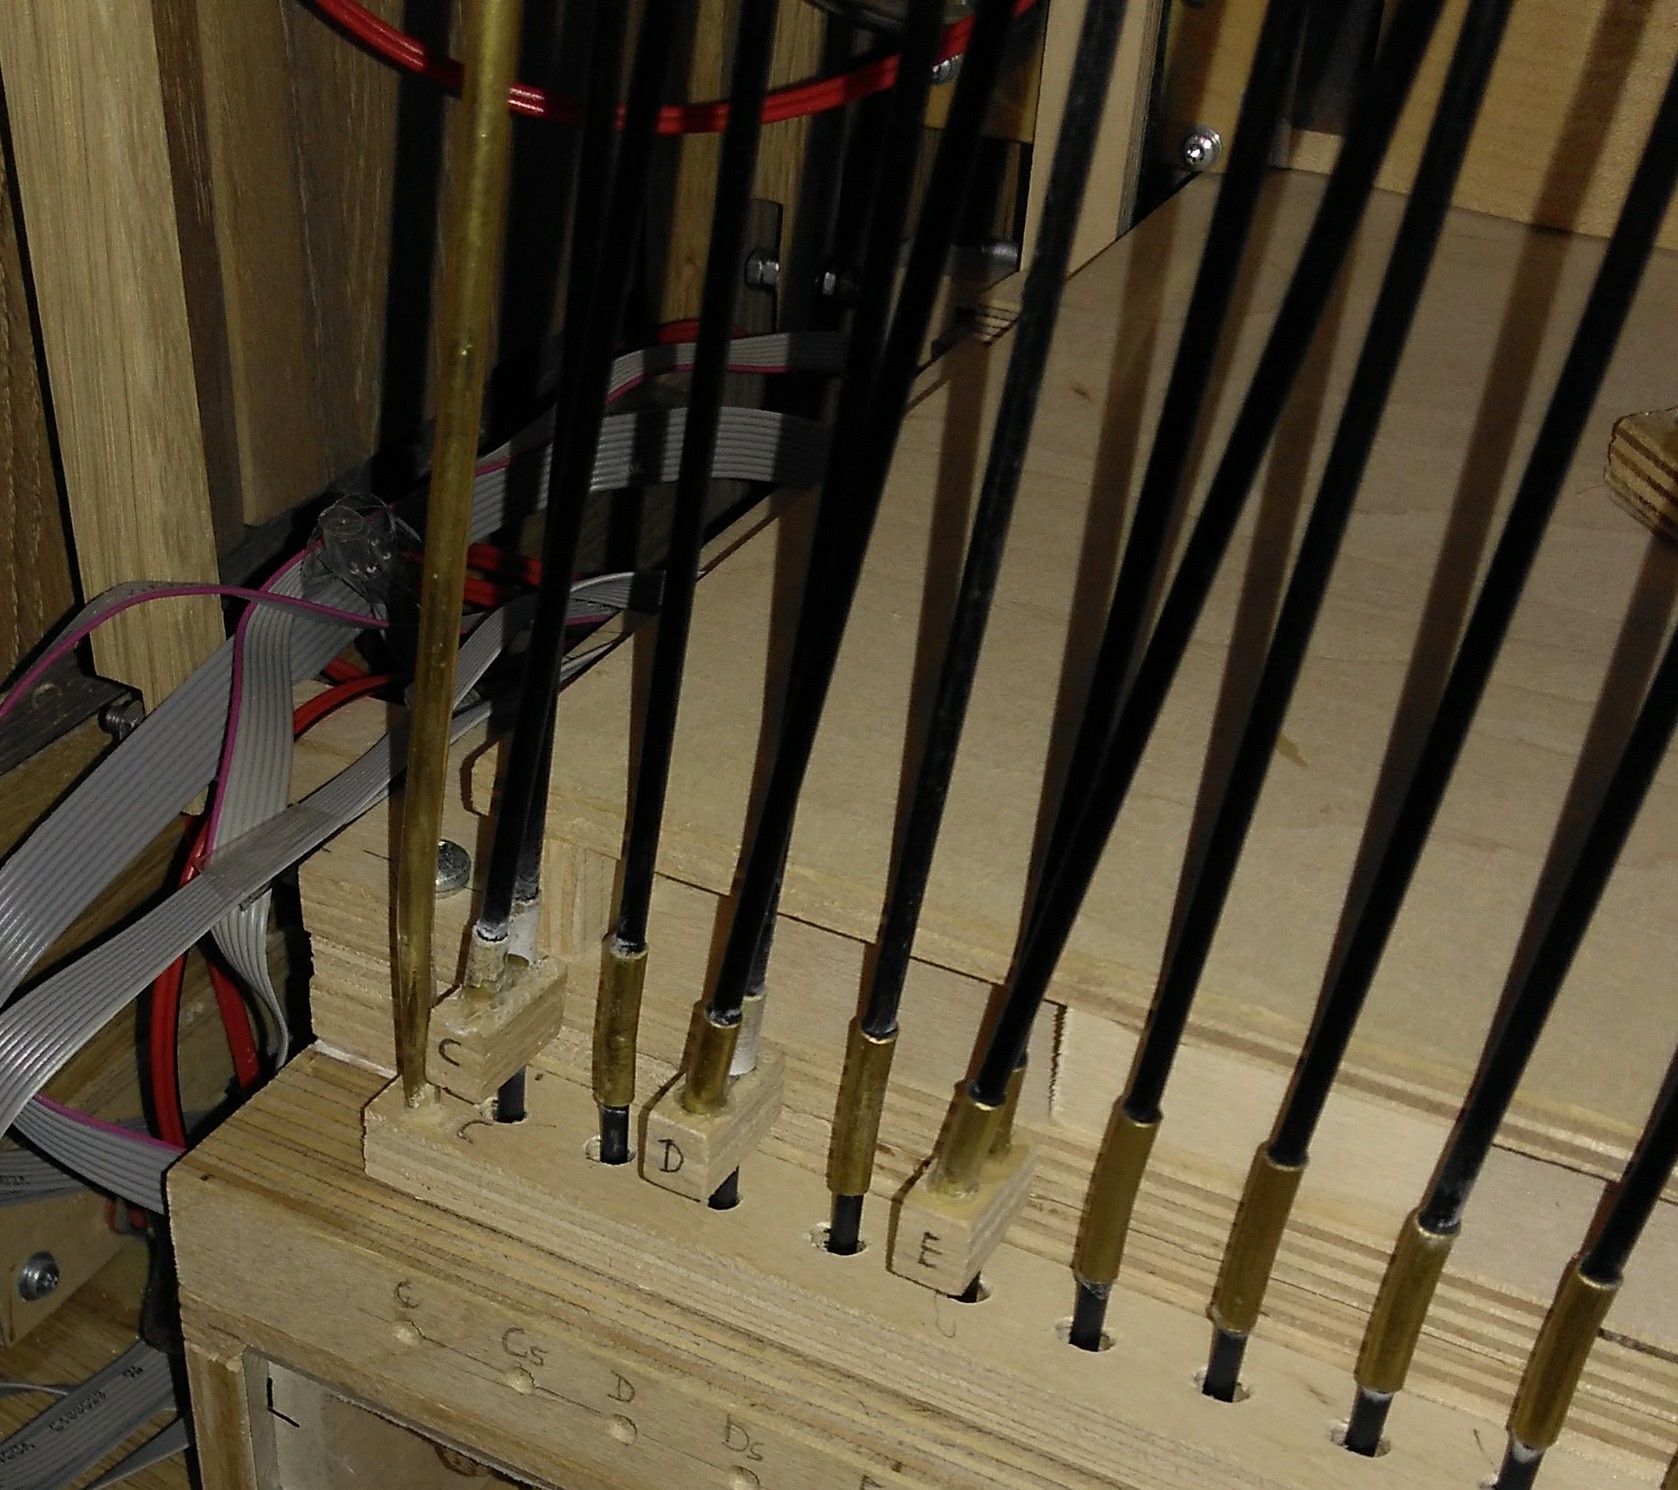
At the top end, which can't be seen here, there's a lenght regulation to adjust the rods. I'll post an image soon.
The rods don't really end up all in the windchest: The double rods end up in a single rod below the little blocks and then this goes into the chest. This means that for C, D, and E, always two rods are moving, but it doesn't seem to be an issue. The keys feel a bit different, but that's ok.
Greetings back to China! Are you also a hobbyist builder?
Regards, Jens
-
Hallo liebe Hausorgelfreunde,
heute ist die Umschaltvorrichtung von langer- auf kurze Bassoktave fertig geworden. Das wollte ich Euch nicht vorenthalten:
Das "Feature" ist nützlich, um alte Literatur spielen zu können, die diese Bassoktave voraussetzt. Somit muss man nicht Noten transponieren die man sonst nicht greifen könnte. Mir ist es tatsächlich schon passiert, dass ich Stücke gespielt habe, wo man in der linken Hand anderthalb Oktaven Umfang greifen soll. Mit dieser Vorrichtung bin ich für diese Fälle gewappnet

Gruß, Jens
-
Hallo Gert, vielleicht kann Dir jemand hier helfen, ich glaube aber Du hast Dich im Forum geirrt. Hier geht es hauptsächlich um Pfeifenorgel im Haus/Heimbereich. Das ELKA scheint mir eher ein Synthesizer aus den 80ern zu sein. Vielleicht gibt es im Netz da andere Foren wo Die geholfen werden kann, eher im Synthi/Vintage-Synthi-Bereich. In der Hoffnung dass Dir jemand helfen kann ein frohes neues Jahr und Gruß!